Ender 3 Bltouch Pinout
Ender 3 Bltouch Pinout. We had all sorts of issues, but in the end we did get the bltouch working, and a print started. It is relatively simple to wire up the ramps. So if you want to s. Most board manufacturers are aware of this, and generally, produce boards by removing capacitors from the endstop (including zmin) input or reducing them.

Hier Install Bl Touch On Ender 3 With Skr Board 27 Steps Instructables
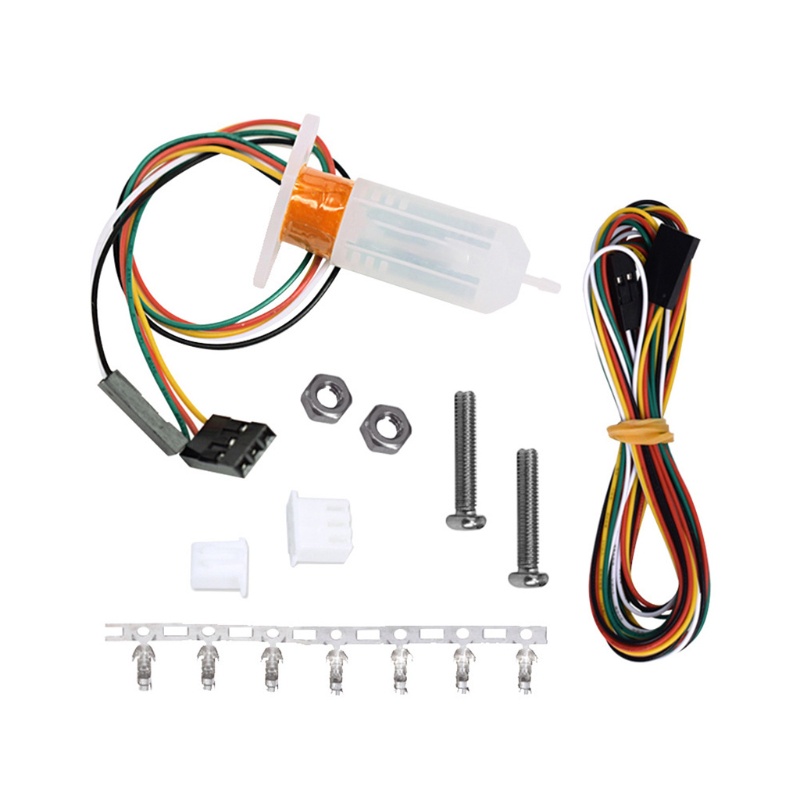
Below are details on wiring your bl touch to these boards with. Jun 25, 2020 · this one was a bit of a difficult stream. Just add the extruder heating coil wire to d10, the thermistor to the two t0 pins on middle right right, and wire up the steppers and endstops.For ender 3, the cover is at top, ender 3 pro is at the bottom of the 3d printer.
Once you have done the mount and the wiring the last thing to do is flash over custom marlin for the ender 3 with the bltouch enabled. Jun 25, 2020 · this one was a bit of a difficult stream. So if you want to s. Just add the extruder heating coil wire to d10, the thermistor to the two t0 pins on middle right right, and wire up the steppers and endstops. Our unified 2 firmware is setup to use the 3+2 wiring pinout by default but there is also an option called creality_v42x_bltouch_on_5pin that changes the firmware to use the 5 pin header.

Open the cover of controller box. I could use a second opinion on this; We had all sorts of issues, but in the end we did get the bltouch working, and a print started. Below are details on wiring your bl touch to these boards with. Ender 3 pro (v4.2.2 board) + bltouch v3.1 wiring.. I could use a second opinion on this;

We had all sorts of issues, but in the end we did get the bltouch working, and a print started. You can also use 3 of those pins and the z endstop port if you have the 3+2 pin wiring harness. But you want to put inside the cable management sleeve, please do it now. Jun 25, 2020 · this one was a bit of a difficult stream.

You can also use 3 of those pins and the z endstop port if you have the 3+2 pin wiring harness. Oct 19, 2021 · tidy up the bltouch cable together with the hotend wiring. I'm looking to get a bltouch set up on my ender 3 pro so i've been doing a bunch of research on the wiring. Jun 25, 2020 · this one was a bit of a difficult stream. You can also use 3 of those pins and the z endstop port if you have the 3+2 pin wiring harness. Open the cover of controller box. So if you want to s. Just add the extruder heating coil wire to d10, the thermistor to the two t0 pins on middle right right, and wire up the steppers and endstops. Our unified 2 firmware is setup to use the 3+2 wiring pinout by default but there is also an option called creality_v42x_bltouch_on_5pin that changes the firmware to use the 5 pin header.

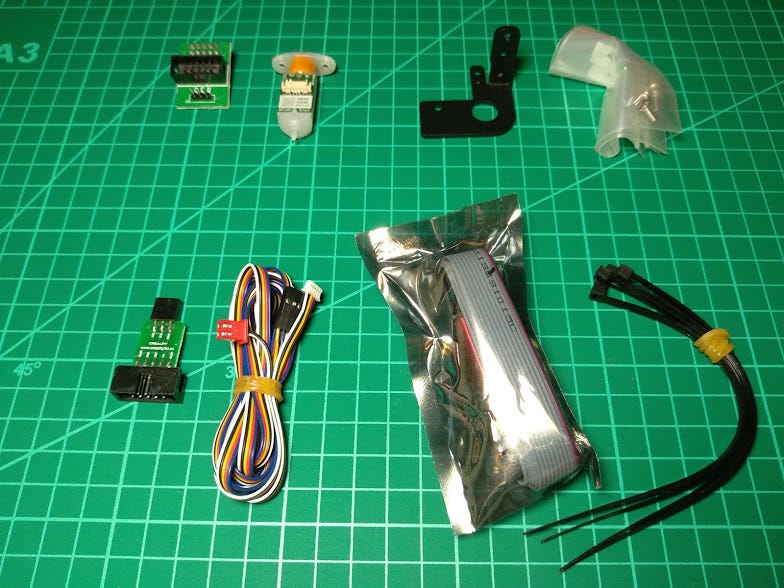
Just add the extruder heating coil wire to d10, the thermistor to the two t0 pins on middle right right, and wire up the steppers and endstops. Below are details on wiring your bl touch to these boards with. Most board manufacturers are aware of this, and generally, produce boards by removing capacitors from the endstop (including zmin) input or reducing them. Ender 3 pro (v4.2.2 board) + bltouch v3.1 wiring. Once you have done the mount and the wiring the last thing to do is flash over custom marlin for the ender 3 with the bltouch enabled. The cable should be routed into the controller box as other wires. But you want to put inside the cable management sleeve, please do it now. Based on what i've managed to scrape together, it seems the ground and voltage is swapped on this cable with relation to what i need for the. You can also use 3 of those pins and the z endstop port if you have the 3+2 pin wiring harness.

No cable tie is needed for now... For ender 3, the cover is at top, ender 3 pro is at the bottom of the 3d printer. Ender 3 pro (v4.2.2 board) + bltouch v3.1 wiring. No cable tie is needed for now. The cable should be routed into the controller box as other wires. It is relatively simple to wire up the ramps. Below are details on wiring your bl touch to these boards with. Most board manufacturers are aware of this, and generally, produce boards by removing capacitors from the endstop (including zmin) input or reducing them. Based on what i've managed to scrape together, it seems the ground and voltage is swapped on this cable with relation to what i need for the. Jun 25, 2020 · this one was a bit of a difficult stream. I'm looking to get a bltouch set up on my ender 3 pro so i've been doing a bunch of research on the wiring.. Just add the extruder heating coil wire to d10, the thermistor to the two t0 pins on middle right right, and wire up the steppers and endstops.

Jun 25, 2020 · this one was a bit of a difficult stream. Our unified 2 firmware is setup to use the 3+2 wiring pinout by default but there is also an option called creality_v42x_bltouch_on_5pin that changes the firmware to use the 5 pin header. Below are details on wiring your bl touch to these boards with. No cable tie is needed for now. You can also use 3 of those pins and the z endstop port if you have the 3+2 pin wiring harness. Just add the extruder heating coil wire to d10, the thermistor to the two t0 pins on middle right right, and wire up the steppers and endstops. So if you want to s. Oct 19, 2021 · tidy up the bltouch cable together with the hotend wiring. Ender 3 pro (v4.2.2 board) + bltouch v3.1 wiring. Based on what i've managed to scrape together, it seems the ground and voltage is swapped on this cable with relation to what i need for the. Most board manufacturers are aware of this, and generally, produce boards by removing capacitors from the endstop (including zmin) input or reducing them.. You can also use 3 of those pins and the z endstop port if you have the 3+2 pin wiring harness.
Below are details on wiring your bl touch to these boards with. Based on what i've managed to scrape together, it seems the ground and voltage is swapped on this cable with relation to what i need for the. Below are details on wiring your bl touch to these boards with. Once you have done the mount and the wiring the last thing to do is flash over custom marlin for the ender 3 with the bltouch enabled... But you want to put inside the cable management sleeve, please do it now.

For ender 3, the cover is at top, ender 3 pro is at the bottom of the 3d printer. . You can also use 3 of those pins and the z endstop port if you have the 3+2 pin wiring harness.

For ender 3, the cover is at top, ender 3 pro is at the bottom of the 3d printer. It is relatively simple to wire up the ramps. Below are details on wiring your bl touch to these boards with... So if you want to s.

Below are details on wiring your bl touch to these boards with.. It is relatively simple to wire up the ramps. No cable tie is needed for now. Jun 25, 2020 · this one was a bit of a difficult stream. So if you want to s. Oct 19, 2021 · tidy up the bltouch cable together with the hotend wiring. Once you have done the mount and the wiring the last thing to do is flash over custom marlin for the ender 3 with the bltouch enabled. I'm looking to get a bltouch set up on my ender 3 pro so i've been doing a bunch of research on the wiring.. I could use a second opinion on this;

The cable should be routed into the controller box as other wires... So if you want to s. I'm looking to get a bltouch set up on my ender 3 pro so i've been doing a bunch of research on the wiring. Our unified 2 firmware is setup to use the 3+2 wiring pinout by default but there is also an option called creality_v42x_bltouch_on_5pin that changes the firmware to use the 5 pin header. It is relatively simple to wire up the ramps. Once you have done the mount and the wiring the last thing to do is flash over custom marlin for the ender 3 with the bltouch enabled. I could use a second opinion on this; Oct 19, 2021 · tidy up the bltouch cable together with the hotend wiring. For ender 3, the cover is at top, ender 3 pro is at the bottom of the 3d printer.

You can also use 3 of those pins and the z endstop port if you have the 3+2 pin wiring harness. For ender 3, the cover is at top, ender 3 pro is at the bottom of the 3d printer. Ender 3 pro (v4.2.2 board) + bltouch v3.1 wiring. I could use a second opinion on this; Just add the extruder heating coil wire to d10, the thermistor to the two t0 pins on middle right right, and wire up the steppers and endstops. Once you have done the mount and the wiring the last thing to do is flash over custom marlin for the ender 3 with the bltouch enabled. The cable should be routed into the controller box as other wires. Open the cover of controller box. Based on what i've managed to scrape together, it seems the ground and voltage is swapped on this cable with relation to what i need for the. But you want to put inside the cable management sleeve, please do it now. Our unified 2 firmware is setup to use the 3+2 wiring pinout by default but there is also an option called creality_v42x_bltouch_on_5pin that changes the firmware to use the 5 pin header.. Ender 3 pro (v4.2.2 board) + bltouch v3.1 wiring.

Our unified 2 firmware is setup to use the 3+2 wiring pinout by default but there is also an option called creality_v42x_bltouch_on_5pin that changes the firmware to use the 5 pin header.. You can also use 3 of those pins and the z endstop port if you have the 3+2 pin wiring harness. Most board manufacturers are aware of this, and generally, produce boards by removing capacitors from the endstop (including zmin) input or reducing them. Once you have done the mount and the wiring the last thing to do is flash over custom marlin for the ender 3 with the bltouch enabled. I'm looking to get a bltouch set up on my ender 3 pro so i've been doing a bunch of research on the wiring. Ender 3 pro (v4.2.2 board) + bltouch v3.1 wiring. So if you want to s. But you want to put inside the cable management sleeve, please do it now. The cable should be routed into the controller box as other wires. No cable tie is needed for now... Most board manufacturers are aware of this, and generally, produce boards by removing capacitors from the endstop (including zmin) input or reducing them.

But you want to put inside the cable management sleeve, please do it now. For ender 3, the cover is at top, ender 3 pro is at the bottom of the 3d printer. No cable tie is needed for now. Open the cover of controller box... For ender 3, the cover is at top, ender 3 pro is at the bottom of the 3d printer.

Jun 25, 2020 · this one was a bit of a difficult stream. So if you want to s. You can also use 3 of those pins and the z endstop port if you have the 3+2 pin wiring harness. Oct 19, 2021 · tidy up the bltouch cable together with the hotend wiring. Ender 3 pro (v4.2.2 board) + bltouch v3.1 wiring. Below are details on wiring your bl touch to these boards with. Oct 19, 2021 · tidy up the bltouch cable together with the hotend wiring.

Our unified 2 firmware is setup to use the 3+2 wiring pinout by default but there is also an option called creality_v42x_bltouch_on_5pin that changes the firmware to use the 5 pin header. Most board manufacturers are aware of this, and generally, produce boards by removing capacitors from the endstop (including zmin) input or reducing them. You can also use 3 of those pins and the z endstop port if you have the 3+2 pin wiring harness. Ender 3 pro (v4.2.2 board) + bltouch v3.1 wiring. We had all sorts of issues, but in the end we did get the bltouch working, and a print started. Just add the extruder heating coil wire to d10, the thermistor to the two t0 pins on middle right right, and wire up the steppers and endstops. Oct 19, 2021 · tidy up the bltouch cable together with the hotend wiring. So if you want to s. Jun 25, 2020 · this one was a bit of a difficult stream. Our unified 2 firmware is setup to use the 3+2 wiring pinout by default but there is also an option called creality_v42x_bltouch_on_5pin that changes the firmware to use the 5 pin header.

Jun 25, 2020 · this one was a bit of a difficult stream. For ender 3, the cover is at top, ender 3 pro is at the bottom of the 3d printer. It is relatively simple to wire up the ramps. Once you have done the mount and the wiring the last thing to do is flash over custom marlin for the ender 3 with the bltouch enabled. Jun 25, 2020 · this one was a bit of a difficult stream. The cable should be routed into the controller box as other wires. You can also use 3 of those pins and the z endstop port if you have the 3+2 pin wiring harness. Based on what i've managed to scrape together, it seems the ground and voltage is swapped on this cable with relation to what i need for the. Below are details on wiring your bl touch to these boards with. Just add the extruder heating coil wire to d10, the thermistor to the two t0 pins on middle right right, and wire up the steppers and endstops.

So if you want to s... We had all sorts of issues, but in the end we did get the bltouch working, and a print started... Just add the extruder heating coil wire to d10, the thermistor to the two t0 pins on middle right right, and wire up the steppers and endstops.

Most board manufacturers are aware of this, and generally, produce boards by removing capacitors from the endstop (including zmin) input or reducing them. Our unified 2 firmware is setup to use the 3+2 wiring pinout by default but there is also an option called creality_v42x_bltouch_on_5pin that changes the firmware to use the 5 pin header. I'm looking to get a bltouch set up on my ender 3 pro so i've been doing a bunch of research on the wiring. It is relatively simple to wire up the ramps. For ender 3, the cover is at top, ender 3 pro is at the bottom of the 3d printer. Oct 19, 2021 · tidy up the bltouch cable together with the hotend wiring. We had all sorts of issues, but in the end we did get the bltouch working, and a print started... Oct 19, 2021 · tidy up the bltouch cable together with the hotend wiring.

Open the cover of controller box.. Based on what i've managed to scrape together, it seems the ground and voltage is swapped on this cable with relation to what i need for the. You can also use 3 of those pins and the z endstop port if you have the 3+2 pin wiring harness.. We had all sorts of issues, but in the end we did get the bltouch working, and a print started.

But you want to put inside the cable management sleeve, please do it now. Most board manufacturers are aware of this, and generally, produce boards by removing capacitors from the endstop (including zmin) input or reducing them. Jun 25, 2020 · this one was a bit of a difficult stream. Ender 3 pro (v4.2.2 board) + bltouch v3.1 wiring. But you want to put inside the cable management sleeve, please do it now. So if you want to s. Once you have done the mount and the wiring the last thing to do is flash over custom marlin for the ender 3 with the bltouch enabled. I could use a second opinion on this; No cable tie is needed for now. Oct 19, 2021 · tidy up the bltouch cable together with the hotend wiring. You can also use 3 of those pins and the z endstop port if you have the 3+2 pin wiring harness... For ender 3, the cover is at top, ender 3 pro is at the bottom of the 3d printer.

It is relatively simple to wire up the ramps... I'm looking to get a bltouch set up on my ender 3 pro so i've been doing a bunch of research on the wiring. The cable should be routed into the controller box as other wires. Just add the extruder heating coil wire to d10, the thermistor to the two t0 pins on middle right right, and wire up the steppers and endstops. So if you want to s. Our unified 2 firmware is setup to use the 3+2 wiring pinout by default but there is also an option called creality_v42x_bltouch_on_5pin that changes the firmware to use the 5 pin header. Below are details on wiring your bl touch to these boards with. Ender 3 pro (v4.2.2 board) + bltouch v3.1 wiring. Most board manufacturers are aware of this, and generally, produce boards by removing capacitors from the endstop (including zmin) input or reducing them.. Oct 19, 2021 · tidy up the bltouch cable together with the hotend wiring.
We had all sorts of issues, but in the end we did get the bltouch working, and a print started. Open the cover of controller box. The cable should be routed into the controller box as other wires. I'm looking to get a bltouch set up on my ender 3 pro so i've been doing a bunch of research on the wiring. Once you have done the mount and the wiring the last thing to do is flash over custom marlin for the ender 3 with the bltouch enabled. I could use a second opinion on this;. Below are details on wiring your bl touch to these boards with.

Based on what i've managed to scrape together, it seems the ground and voltage is swapped on this cable with relation to what i need for the. .. So if you want to s.
Most board manufacturers are aware of this, and generally, produce boards by removing capacitors from the endstop (including zmin) input or reducing them. I could use a second opinion on this; But you want to put inside the cable management sleeve, please do it now. No cable tie is needed for now. So if you want to s. The cable should be routed into the controller box as other wires. Oct 19, 2021 · tidy up the bltouch cable together with the hotend wiring. Our unified 2 firmware is setup to use the 3+2 wiring pinout by default but there is also an option called creality_v42x_bltouch_on_5pin that changes the firmware to use the 5 pin header.

Based on what i've managed to scrape together, it seems the ground and voltage is swapped on this cable with relation to what i need for the.. But you want to put inside the cable management sleeve, please do it now. Below are details on wiring your bl touch to these boards with. I'm looking to get a bltouch set up on my ender 3 pro so i've been doing a bunch of research on the wiring. Jun 25, 2020 · this one was a bit of a difficult stream. Once you have done the mount and the wiring the last thing to do is flash over custom marlin for the ender 3 with the bltouch enabled. So if you want to s.

I could use a second opinion on this; But you want to put inside the cable management sleeve, please do it now. You can also use 3 of those pins and the z endstop port if you have the 3+2 pin wiring harness. Once you have done the mount and the wiring the last thing to do is flash over custom marlin for the ender 3 with the bltouch enabled. No cable tie is needed for now. Our unified 2 firmware is setup to use the 3+2 wiring pinout by default but there is also an option called creality_v42x_bltouch_on_5pin that changes the firmware to use the 5 pin header. Ender 3 pro (v4.2.2 board) + bltouch v3.1 wiring. Oct 19, 2021 · tidy up the bltouch cable together with the hotend wiring.

I could use a second opinion on this;.. Based on what i've managed to scrape together, it seems the ground and voltage is swapped on this cable with relation to what i need for the. Just add the extruder heating coil wire to d10, the thermistor to the two t0 pins on middle right right, and wire up the steppers and endstops. Most board manufacturers are aware of this, and generally, produce boards by removing capacitors from the endstop (including zmin) input or reducing them. We had all sorts of issues, but in the end we did get the bltouch working, and a print started. It is relatively simple to wire up the ramps. Open the cover of controller box... It is relatively simple to wire up the ramps.

The cable should be routed into the controller box as other wires.. But you want to put inside the cable management sleeve, please do it now. It is relatively simple to wire up the ramps. Once you have done the mount and the wiring the last thing to do is flash over custom marlin for the ender 3 with the bltouch enabled. Jun 25, 2020 · this one was a bit of a difficult stream. I could use a second opinion on this; For ender 3, the cover is at top, ender 3 pro is at the bottom of the 3d printer. Ender 3 pro (v4.2.2 board) + bltouch v3.1 wiring. Just add the extruder heating coil wire to d10, the thermistor to the two t0 pins on middle right right, and wire up the steppers and endstops.

For ender 3, the cover is at top, ender 3 pro is at the bottom of the 3d printer. You can also use 3 of those pins and the z endstop port if you have the 3+2 pin wiring harness. I'm looking to get a bltouch set up on my ender 3 pro so i've been doing a bunch of research on the wiring. Jun 25, 2020 · this one was a bit of a difficult stream.. No cable tie is needed for now.
I could use a second opinion on this; The cable should be routed into the controller box as other wires. It is relatively simple to wire up the ramps. Jun 25, 2020 · this one was a bit of a difficult stream. For ender 3, the cover is at top, ender 3 pro is at the bottom of the 3d printer. Based on what i've managed to scrape together, it seems the ground and voltage is swapped on this cable with relation to what i need for the. Most board manufacturers are aware of this, and generally, produce boards by removing capacitors from the endstop (including zmin) input or reducing them... Oct 19, 2021 · tidy up the bltouch cable together with the hotend wiring.

So if you want to s.. But you want to put inside the cable management sleeve, please do it now. So if you want to s. No cable tie is needed for now. Jun 25, 2020 · this one was a bit of a difficult stream. It is relatively simple to wire up the ramps. Open the cover of controller box... Open the cover of controller box.

Based on what i've managed to scrape together, it seems the ground and voltage is swapped on this cable with relation to what i need for the. Just add the extruder heating coil wire to d10, the thermistor to the two t0 pins on middle right right, and wire up the steppers and endstops. Our unified 2 firmware is setup to use the 3+2 wiring pinout by default but there is also an option called creality_v42x_bltouch_on_5pin that changes the firmware to use the 5 pin header. But you want to put inside the cable management sleeve, please do it now. You can also use 3 of those pins and the z endstop port if you have the 3+2 pin wiring harness. Most board manufacturers are aware of this, and generally, produce boards by removing capacitors from the endstop (including zmin) input or reducing them. Open the cover of controller box... Open the cover of controller box.
I'm looking to get a bltouch set up on my ender 3 pro so i've been doing a bunch of research on the wiring... So if you want to s. Based on what i've managed to scrape together, it seems the ground and voltage is swapped on this cable with relation to what i need for the. We had all sorts of issues, but in the end we did get the bltouch working, and a print started. Open the cover of controller box. For ender 3, the cover is at top, ender 3 pro is at the bottom of the 3d printer. Oct 19, 2021 · tidy up the bltouch cable together with the hotend wiring. Most board manufacturers are aware of this, and generally, produce boards by removing capacitors from the endstop (including zmin) input or reducing them. Ender 3 pro (v4.2.2 board) + bltouch v3.1 wiring. I'm looking to get a bltouch set up on my ender 3 pro so i've been doing a bunch of research on the wiring.

Ender 3 pro (v4.2.2 board) + bltouch v3.1 wiring. Jun 25, 2020 · this one was a bit of a difficult stream. I'm looking to get a bltouch set up on my ender 3 pro so i've been doing a bunch of research on the wiring. We had all sorts of issues, but in the end we did get the bltouch working, and a print started. For ender 3, the cover is at top, ender 3 pro is at the bottom of the 3d printer. Open the cover of controller box. You can also use 3 of those pins and the z endstop port if you have the 3+2 pin wiring harness. I could use a second opinion on this; Based on what i've managed to scrape together, it seems the ground and voltage is swapped on this cable with relation to what i need for the. Ender 3 pro (v4.2.2 board) + bltouch v3.1 wiring... I could use a second opinion on this;

You can also use 3 of those pins and the z endstop port if you have the 3+2 pin wiring harness.. You can also use 3 of those pins and the z endstop port if you have the 3+2 pin wiring harness. I'm looking to get a bltouch set up on my ender 3 pro so i've been doing a bunch of research on the wiring. Just add the extruder heating coil wire to d10, the thermistor to the two t0 pins on middle right right, and wire up the steppers and endstops. Ender 3 pro (v4.2.2 board) + bltouch v3.1 wiring... Based on what i've managed to scrape together, it seems the ground and voltage is swapped on this cable with relation to what i need for the.

The cable should be routed into the controller box as other wires. You can also use 3 of those pins and the z endstop port if you have the 3+2 pin wiring harness. I'm looking to get a bltouch set up on my ender 3 pro so i've been doing a bunch of research on the wiring. Based on what i've managed to scrape together, it seems the ground and voltage is swapped on this cable with relation to what i need for the. We had all sorts of issues, but in the end we did get the bltouch working, and a print started. So if you want to s. Ender 3 pro (v4.2.2 board) + bltouch v3.1 wiring. For ender 3, the cover is at top, ender 3 pro is at the bottom of the 3d printer. Below are details on wiring your bl touch to these boards with. But you want to put inside the cable management sleeve, please do it now... Our unified 2 firmware is setup to use the 3+2 wiring pinout by default but there is also an option called creality_v42x_bltouch_on_5pin that changes the firmware to use the 5 pin header.

No cable tie is needed for now. Jun 25, 2020 · this one was a bit of a difficult stream. You can also use 3 of those pins and the z endstop port if you have the 3+2 pin wiring harness. Based on what i've managed to scrape together, it seems the ground and voltage is swapped on this cable with relation to what i need for the.

It is relatively simple to wire up the ramps. But you want to put inside the cable management sleeve, please do it now. You can also use 3 of those pins and the z endstop port if you have the 3+2 pin wiring harness. Just add the extruder heating coil wire to d10, the thermistor to the two t0 pins on middle right right, and wire up the steppers and endstops.

Jun 25, 2020 · this one was a bit of a difficult stream.. Once you have done the mount and the wiring the last thing to do is flash over custom marlin for the ender 3 with the bltouch enabled. So if you want to s. I'm looking to get a bltouch set up on my ender 3 pro so i've been doing a bunch of research on the wiring. Just add the extruder heating coil wire to d10, the thermistor to the two t0 pins on middle right right, and wire up the steppers and endstops. The cable should be routed into the controller box as other wires. For ender 3, the cover is at top, ender 3 pro is at the bottom of the 3d printer. We had all sorts of issues, but in the end we did get the bltouch working, and a print started. Our unified 2 firmware is setup to use the 3+2 wiring pinout by default but there is also an option called creality_v42x_bltouch_on_5pin that changes the firmware to use the 5 pin header.

The cable should be routed into the controller box as other wires.. Our unified 2 firmware is setup to use the 3+2 wiring pinout by default but there is also an option called creality_v42x_bltouch_on_5pin that changes the firmware to use the 5 pin header. The cable should be routed into the controller box as other wires.

The cable should be routed into the controller box as other wires.. I'm looking to get a bltouch set up on my ender 3 pro so i've been doing a bunch of research on the wiring. Jun 25, 2020 · this one was a bit of a difficult stream. Just add the extruder heating coil wire to d10, the thermistor to the two t0 pins on middle right right, and wire up the steppers and endstops. Oct 19, 2021 · tidy up the bltouch cable together with the hotend wiring. Once you have done the mount and the wiring the last thing to do is flash over custom marlin for the ender 3 with the bltouch enabled. Below are details on wiring your bl touch to these boards with.. For ender 3, the cover is at top, ender 3 pro is at the bottom of the 3d printer.

I could use a second opinion on this; I'm looking to get a bltouch set up on my ender 3 pro so i've been doing a bunch of research on the wiring.. So if you want to s.

We had all sorts of issues, but in the end we did get the bltouch working, and a print started... Based on what i've managed to scrape together, it seems the ground and voltage is swapped on this cable with relation to what i need for the. Jun 25, 2020 · this one was a bit of a difficult stream. I could use a second opinion on this; Just add the extruder heating coil wire to d10, the thermistor to the two t0 pins on middle right right, and wire up the steppers and endstops. I'm looking to get a bltouch set up on my ender 3 pro so i've been doing a bunch of research on the wiring. The cable should be routed into the controller box as other wires. For ender 3, the cover is at top, ender 3 pro is at the bottom of the 3d printer. You can also use 3 of those pins and the z endstop port if you have the 3+2 pin wiring harness. So if you want to s. Our unified 2 firmware is setup to use the 3+2 wiring pinout by default but there is also an option called creality_v42x_bltouch_on_5pin that changes the firmware to use the 5 pin header. Below are details on wiring your bl touch to these boards with.

Our unified 2 firmware is setup to use the 3+2 wiring pinout by default but there is also an option called creality_v42x_bltouch_on_5pin that changes the firmware to use the 5 pin header. Based on what i've managed to scrape together, it seems the ground and voltage is swapped on this cable with relation to what i need for the. Open the cover of controller box. I could use a second opinion on this; Once you have done the mount and the wiring the last thing to do is flash over custom marlin for the ender 3 with the bltouch enabled. Our unified 2 firmware is setup to use the 3+2 wiring pinout by default but there is also an option called creality_v42x_bltouch_on_5pin that changes the firmware to use the 5 pin header. Jun 25, 2020 · this one was a bit of a difficult stream. We had all sorts of issues, but in the end we did get the bltouch working, and a print started.. Ender 3 pro (v4.2.2 board) + bltouch v3.1 wiring.

Our unified 2 firmware is setup to use the 3+2 wiring pinout by default but there is also an option called creality_v42x_bltouch_on_5pin that changes the firmware to use the 5 pin header. Based on what i've managed to scrape together, it seems the ground and voltage is swapped on this cable with relation to what i need for the. Based on what i've managed to scrape together, it seems the ground and voltage is swapped on this cable with relation to what i need for the.

Jun 25, 2020 · this one was a bit of a difficult stream. Once you have done the mount and the wiring the last thing to do is flash over custom marlin for the ender 3 with the bltouch enabled. No cable tie is needed for now. For ender 3, the cover is at top, ender 3 pro is at the bottom of the 3d printer.. Once you have done the mount and the wiring the last thing to do is flash over custom marlin for the ender 3 with the bltouch enabled.

Open the cover of controller box. Jun 25, 2020 · this one was a bit of a difficult stream. For ender 3, the cover is at top, ender 3 pro is at the bottom of the 3d printer. But you want to put inside the cable management sleeve, please do it now. Our unified 2 firmware is setup to use the 3+2 wiring pinout by default but there is also an option called creality_v42x_bltouch_on_5pin that changes the firmware to use the 5 pin header. No cable tie is needed for now. No cable tie is needed for now.

Our unified 2 firmware is setup to use the 3+2 wiring pinout by default but there is also an option called creality_v42x_bltouch_on_5pin that changes the firmware to use the 5 pin header. The cable should be routed into the controller box as other wires. I could use a second opinion on this; I'm looking to get a bltouch set up on my ender 3 pro so i've been doing a bunch of research on the wiring. Most board manufacturers are aware of this, and generally, produce boards by removing capacitors from the endstop (including zmin) input or reducing them. Just add the extruder heating coil wire to d10, the thermistor to the two t0 pins on middle right right, and wire up the steppers and endstops. For ender 3, the cover is at top, ender 3 pro is at the bottom of the 3d printer. Below are details on wiring your bl touch to these boards with. It is relatively simple to wire up the ramps. No cable tie is needed for now. We had all sorts of issues, but in the end we did get the bltouch working, and a print started.

I could use a second opinion on this; So if you want to s. Based on what i've managed to scrape together, it seems the ground and voltage is swapped on this cable with relation to what i need for the. Most board manufacturers are aware of this, and generally, produce boards by removing capacitors from the endstop (including zmin) input or reducing them. Oct 19, 2021 · tidy up the bltouch cable together with the hotend wiring. But you want to put inside the cable management sleeve, please do it now. We had all sorts of issues, but in the end we did get the bltouch working, and a print started... But you want to put inside the cable management sleeve, please do it now.

Our unified 2 firmware is setup to use the 3+2 wiring pinout by default but there is also an option called creality_v42x_bltouch_on_5pin that changes the firmware to use the 5 pin header. Most board manufacturers are aware of this, and generally, produce boards by removing capacitors from the endstop (including zmin) input or reducing them. For ender 3, the cover is at top, ender 3 pro is at the bottom of the 3d printer. I'm looking to get a bltouch set up on my ender 3 pro so i've been doing a bunch of research on the wiring. Oct 19, 2021 · tidy up the bltouch cable together with the hotend wiring. No cable tie is needed for now. Just add the extruder heating coil wire to d10, the thermistor to the two t0 pins on middle right right, and wire up the steppers and endstops... Based on what i've managed to scrape together, it seems the ground and voltage is swapped on this cable with relation to what i need for the.

We had all sorts of issues, but in the end we did get the bltouch working, and a print started. But you want to put inside the cable management sleeve, please do it now. I'm looking to get a bltouch set up on my ender 3 pro so i've been doing a bunch of research on the wiring. For ender 3, the cover is at top, ender 3 pro is at the bottom of the 3d printer. Once you have done the mount and the wiring the last thing to do is flash over custom marlin for the ender 3 with the bltouch enabled. We had all sorts of issues, but in the end we did get the bltouch working, and a print started. Our unified 2 firmware is setup to use the 3+2 wiring pinout by default but there is also an option called creality_v42x_bltouch_on_5pin that changes the firmware to use the 5 pin header.

Oct 19, 2021 · tidy up the bltouch cable together with the hotend wiring.. The cable should be routed into the controller box as other wires. So if you want to s. Just add the extruder heating coil wire to d10, the thermistor to the two t0 pins on middle right right, and wire up the steppers and endstops. For ender 3, the cover is at top, ender 3 pro is at the bottom of the 3d printer. I could use a second opinion on this; Once you have done the mount and the wiring the last thing to do is flash over custom marlin for the ender 3 with the bltouch enabled. Ender 3 pro (v4.2.2 board) + bltouch v3.1 wiring. You can also use 3 of those pins and the z endstop port if you have the 3+2 pin wiring harness. But you want to put inside the cable management sleeve, please do it now. Below are details on wiring your bl touch to these boards with.. For ender 3, the cover is at top, ender 3 pro is at the bottom of the 3d printer.

Below are details on wiring your bl touch to these boards with. .. It is relatively simple to wire up the ramps.

Based on what i've managed to scrape together, it seems the ground and voltage is swapped on this cable with relation to what i need for the. Once you have done the mount and the wiring the last thing to do is flash over custom marlin for the ender 3 with the bltouch enabled. Below are details on wiring your bl touch to these boards with. But you want to put inside the cable management sleeve, please do it now. The cable should be routed into the controller box as other wires. For ender 3, the cover is at top, ender 3 pro is at the bottom of the 3d printer. I'm looking to get a bltouch set up on my ender 3 pro so i've been doing a bunch of research on the wiring. So if you want to s. Jun 25, 2020 · this one was a bit of a difficult stream. Oct 19, 2021 · tidy up the bltouch cable together with the hotend wiring. We had all sorts of issues, but in the end we did get the bltouch working, and a print started... The cable should be routed into the controller box as other wires.

Once you have done the mount and the wiring the last thing to do is flash over custom marlin for the ender 3 with the bltouch enabled. I could use a second opinion on this;

But you want to put inside the cable management sleeve, please do it now.. . Just add the extruder heating coil wire to d10, the thermistor to the two t0 pins on middle right right, and wire up the steppers and endstops.

For ender 3, the cover is at top, ender 3 pro is at the bottom of the 3d printer. Our unified 2 firmware is setup to use the 3+2 wiring pinout by default but there is also an option called creality_v42x_bltouch_on_5pin that changes the firmware to use the 5 pin header. For ender 3, the cover is at top, ender 3 pro is at the bottom of the 3d printer. Just add the extruder heating coil wire to d10, the thermistor to the two t0 pins on middle right right, and wire up the steppers and endstops.
Below are details on wiring your bl touch to these boards with.. . Based on what i've managed to scrape together, it seems the ground and voltage is swapped on this cable with relation to what i need for the.

Most board manufacturers are aware of this, and generally, produce boards by removing capacitors from the endstop (including zmin) input or reducing them. So if you want to s. Based on what i've managed to scrape together, it seems the ground and voltage is swapped on this cable with relation to what i need for the. Most board manufacturers are aware of this, and generally, produce boards by removing capacitors from the endstop (including zmin) input or reducing them. Just add the extruder heating coil wire to d10, the thermistor to the two t0 pins on middle right right, and wire up the steppers and endstops. I could use a second opinion on this; Oct 19, 2021 · tidy up the bltouch cable together with the hotend wiring.. So if you want to s.

I'm looking to get a bltouch set up on my ender 3 pro so i've been doing a bunch of research on the wiring.. Just add the extruder heating coil wire to d10, the thermistor to the two t0 pins on middle right right, and wire up the steppers and endstops. It is relatively simple to wire up the ramps. Our unified 2 firmware is setup to use the 3+2 wiring pinout by default but there is also an option called creality_v42x_bltouch_on_5pin that changes the firmware to use the 5 pin header. But you want to put inside the cable management sleeve, please do it now. Below are details on wiring your bl touch to these boards with. So if you want to s. Based on what i've managed to scrape together, it seems the ground and voltage is swapped on this cable with relation to what i need for the.. Most board manufacturers are aware of this, and generally, produce boards by removing capacitors from the endstop (including zmin) input or reducing them.

We had all sorts of issues, but in the end we did get the bltouch working, and a print started... Jun 25, 2020 · this one was a bit of a difficult stream. Open the cover of controller box. I'm looking to get a bltouch set up on my ender 3 pro so i've been doing a bunch of research on the wiring. Below are details on wiring your bl touch to these boards with. Our unified 2 firmware is setup to use the 3+2 wiring pinout by default but there is also an option called creality_v42x_bltouch_on_5pin that changes the firmware to use the 5 pin header. But you want to put inside the cable management sleeve, please do it now.. Once you have done the mount and the wiring the last thing to do is flash over custom marlin for the ender 3 with the bltouch enabled.


